Showing posts with label Crafts. Show all posts

Sunday, August 24, 2014

Craft Retreat

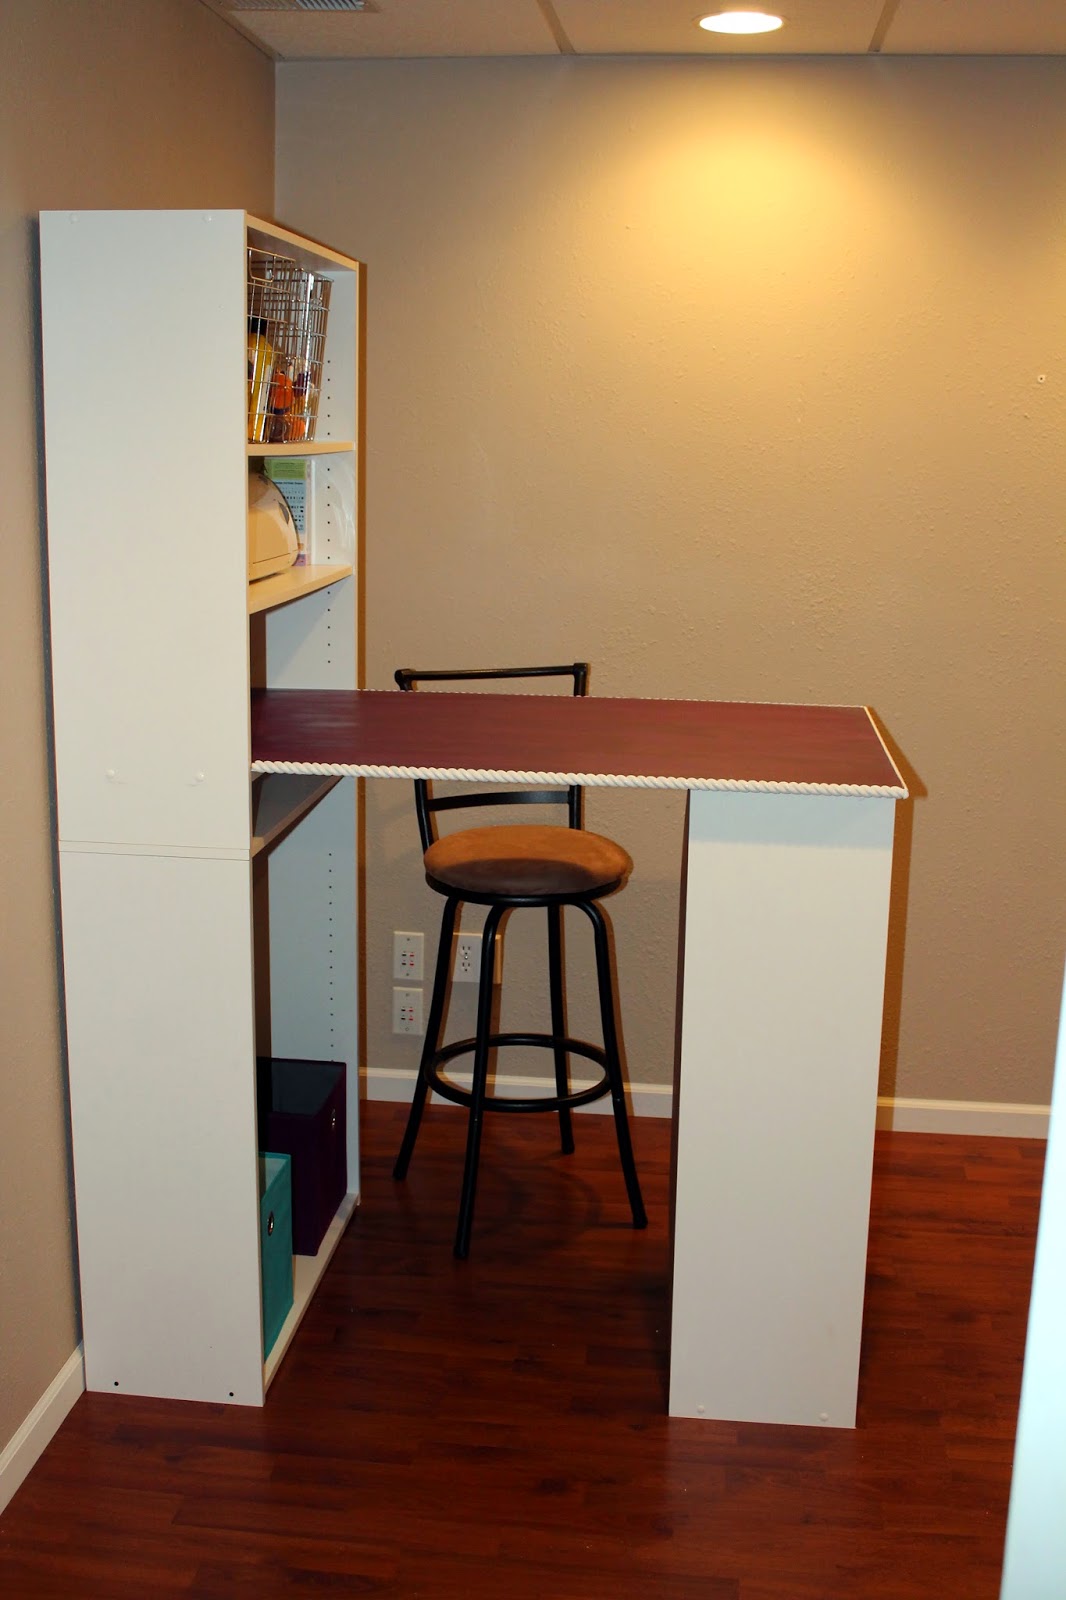
Eight months ago I was thrilled to finally have some closet space in our apartment dedicated to my craft supplies. Today, I'm lucky enough to call an entire room my craft retreat.  Our new home came along with a 'bonus' room in the basement.  It's a small room off the main basement living area that could be used as an extra bedroom or workout space, but Rob has kindly forgo any of his plans so I could make it my own.

I knew that I wanted tons of storage with room to grow my stash, a high table so I can stand while I work without killing my back, and I wanted to keep the cost minimal.


For the table I used bookcases from Target and a board and trim from Lowe's. We actually already owned the shelving unit and were using it for storage in the garage, but after a little reorganization, I was able to free it up.


The room also has a closet - the perfect place to hang fabric.


What did it cost? Here is the breakdown:
     - Small shelf for table - $17
     - Tall shelf for table - $26
     - Board for table - $20
     - Trim for table - $12
     - Paint for table - $3
     - Storage shelf - FREE (already owned)
     - Colored cubes and bins - $50

     Total = $128

I'm really looking forward to creating in this new space!


Friday, February 14, 2014

52 Things I Love About You

Happy Valentine's Day!

In the spirit of Love Day, I thought I would share a gift I made for Rob a few years ago - 52 Things I Love About You.

All it took was a deck of cards, two leaf rings, a computer/printer, a glue stick, cardstock, and sandpaper.

I used a template on Photoshop to type each of my favorite things about Rob and our relationship. After printing them out on cardstock, I used a glue stick to attach one reason to each card and sandpaper to age the look of my project. To finish I just punched two holes on the side of each card and secured them together with leaf rings.

It was such an inexpensive gift, but is still one of Rob's favorites.

Unfortunately, I was unable to find the entire template I used since it has been a few years, but if you like the look of this project and want to use it, feel free to download the cover page, and the red background or black background pages from these links.


Thursday, February 6, 2014

Personalized Handkerchiefs

I have never been so excited to give someone a gift as I was the night of my rehearsal dinner.  It wasn't anything over-the-top or expensive, it was just a simple handkerchief, that carried a personal message.  You may have seen similar projects on Pinterest last summer.  I personalized handkerchiefs for Rob and each of our parents and surprised them with the gift the night before our wedding.
 
I ordered four handkerchiefs online - knitted edges for the ladies and a more manly hem for the guys.  Then, in the month leading up to the wedding I made multiple trips to the sewing center in town.  I had never embroidered anything before, but one of the associates was so helpful and I made sure to come when she was scheduled to work.  

 
Rob knew I was making these for our mothers and fathers, but was completely unaware that I also made one for him...


I'm so happy with how they turned out and it was so touching to see them being used during the ceremony.  By the end of the day, Rob's was covered in my makeup....we decided to keep it that way.

Thursday, January 30, 2014

Nightstand Makeover


I had some fun with an old nightstand the other day. I didn't really need the drawer space, and was looking to add a little more character to the piece. 

The Steps: 


1. Remove the bottom drawer and the drawer tracks.


2. If you have a base piece on your nightstand, great! If it doesn't (like mine) cut a piece of wood to fit. Since I don't plan to put anything too heavy on mine (and because I don't have access to a table saw), I opted to use some heavy foam presentation board.


3. Purchase self adhesive shelf liner and apply it to the area you want to cover. I was able to score 2 rolls on Amazon for $10 and only used half of one roll for this project.


4. Add whatever decor you wish.  For now, I have the table numbers from my wedding to represent our wedding date.  I think it would be nice to put a small flower arrangement here too.


    A simple furniture makeover idea for just dollars. And the good news is that if I want to use the drawer again, all I would have to do is remove the foam board piece and reattach the drawer tracks!

    Monday, January 20, 2014

    Baby Bouquets

    
    Both sides of my family were blessed with adorable additions over the past two weeks.  My cousin Beau and his wife, Ashley, welcomed second child, Mila.  Also, another cousin, Ben and his wife, Randi, brought home their first bundle of joy, Logan.
     
    Sharing a town with Beau and Ashley provided me the awesome opportunity to visit in the hospital, and drive their son, Cruz, to meet his little sister.  I will always cherish the memories of that car ride, hearing him squeal with excitement to meet her.
     
    We also had the chance to meet baby Logan after a quick drive to Des Monies.  He is the absolute sweetest and melted our hearts with a full head of hair and his grunts :)


    I made baby bouquets for the new mommies (and babies).  More useful than flowers, and a little more my crafty style. Scrapbook paper, tissue paper, gift ribbon, burp blankets, and bibs combine to make these adorable newborn gifts.


    Saturday, January 4, 2014

    Kitchen Art

    Looking for some unique wall art?  Here is a cheap, easy DIY project that is perfect for your kitchen. This is over my kitchen table.

    Here's what you'll do:
    1. Purchase a cabinet door - you could really use any piece of wood but I like that a cabinet door already comes with a finished look.
    2. Paint, stain, or age the wood to your liking.
    3. Bend some old spoons (I choose 5 different spoons to add more character to the piece) and hot glue them to the wood. It can be difficult to bend the spoons, but I was able to do it with a hammer and pliers.
    4. Hot glue tea light candles on each spoon.
    5. That's it!


    Monday, December 30, 2013

    Recipe Dish Towels

    We don't often put pen to paper anymore, but there is something so special about a handwritten card, letter, or note.  Take a recipe for instance. How often to you actually write down a recipe when it is so easy to print it off online, take a picture with your phone, or run it through the copy machine?

    When looking through my parents' recipe box, most are in my Grandma's handwriting, copied or passed down.  Many of my childhood memories of my dad's mom are of her in the kitchen, and although we lost our dear Grandma J just short of two years ago, she is always present in the meals the Jorgensen family prepares throughout the year.  Her bread stuffing at Thanksgiving, pancakes on a Sunday morning, and her homemade noodles on that special occasion when my mom has a few days to dedicate to the extensive process.

    When I came across a project idea on Pinterest to preserve a few of my grandmother's recipes on dish towels, I could not pass up the opportunity to make this special keepsake for each household in the Jorgensen family for Christmas.


    Here is how I did it:

    Step 1: Pick the recipes - my sister and cousins Beau and Ashley helped me with this one. We decided on Grandma's stuffing and noodles.


    Step 2: Take a high quality picture of each recipe.

    Step 3: Using an editing program (we used Photoshop) create a 34" by 54" canvas - the size of 1 yard of fabric.  Then, insert your recipes onto the canvas.  We choose to put 4 of them on a yard.  Be sure to account for your seam - we left 2 inches of fabric on each side of each recipe.  Then, to add a little character, we made the background of the canvas a dark brown. Thanks to by husband, Rob (aka - my personal graphic designer), for taking care of this step!

    Step 4: Upload your design to a custom fabric website.  The tutorial for this project that I followed used Spoonflower.  I had not heard of this company before, but I have a feeling we will be working on a lot of projects together in the future :)

    Step 5: Select your fabric and order.  We choose linen and selected the '1 yard' option (the size of our design).  To make enough for all of my family, I ordered 4 yards - to become 16 towels.

    Step 6: Wait......plan ahead for when you need your fabric by - it took about 2.5 weeks for mine to come in, although it was the holiday season.

    Step 7: Scream on the phone with excitement when your husband calls to tell you it has been delivered. OK, so you don't have to do this, but I couldn't wait to see it!


    Step 8: Cut each recipe from your fabric, keeping in mind the extra fabric you will need for your seam!


    Step 9: Use an iron to create a sharp fold for your seam


    Step 10: Sew


     Step 11: Use some of your scraps for a holder on the back if you plan to hang them on a hook.


    Step 11: Admire!

    There is so much history in a recipe and so many stories so share about the person who wrote them. I love that I will be reminded of my grandma everyday in my kitchen.


    Tuesday, December 17, 2013

    Lace Boot Socks

    
    This past year could be dubbed 'Year of the Boot Socks' in the Midwest and I am guilty of hopping on the train.  Problem is, some of my boots are too tight to fit the bulky material. So, I decided to make a thinner pair for myself with some extra lace I had stored away from an old project.

    Step 1: Wrap the lace around your calf to determine the width of your fabric. For the length, I went with about 6 inches.


    Step2: Sew the two sides together to create a tube.


    Step 3: Turn inside out so the hem is on the inside and slip on!


    Should work with boots of all colors! If I come across some cute buttons I may add them as well for a small accent.